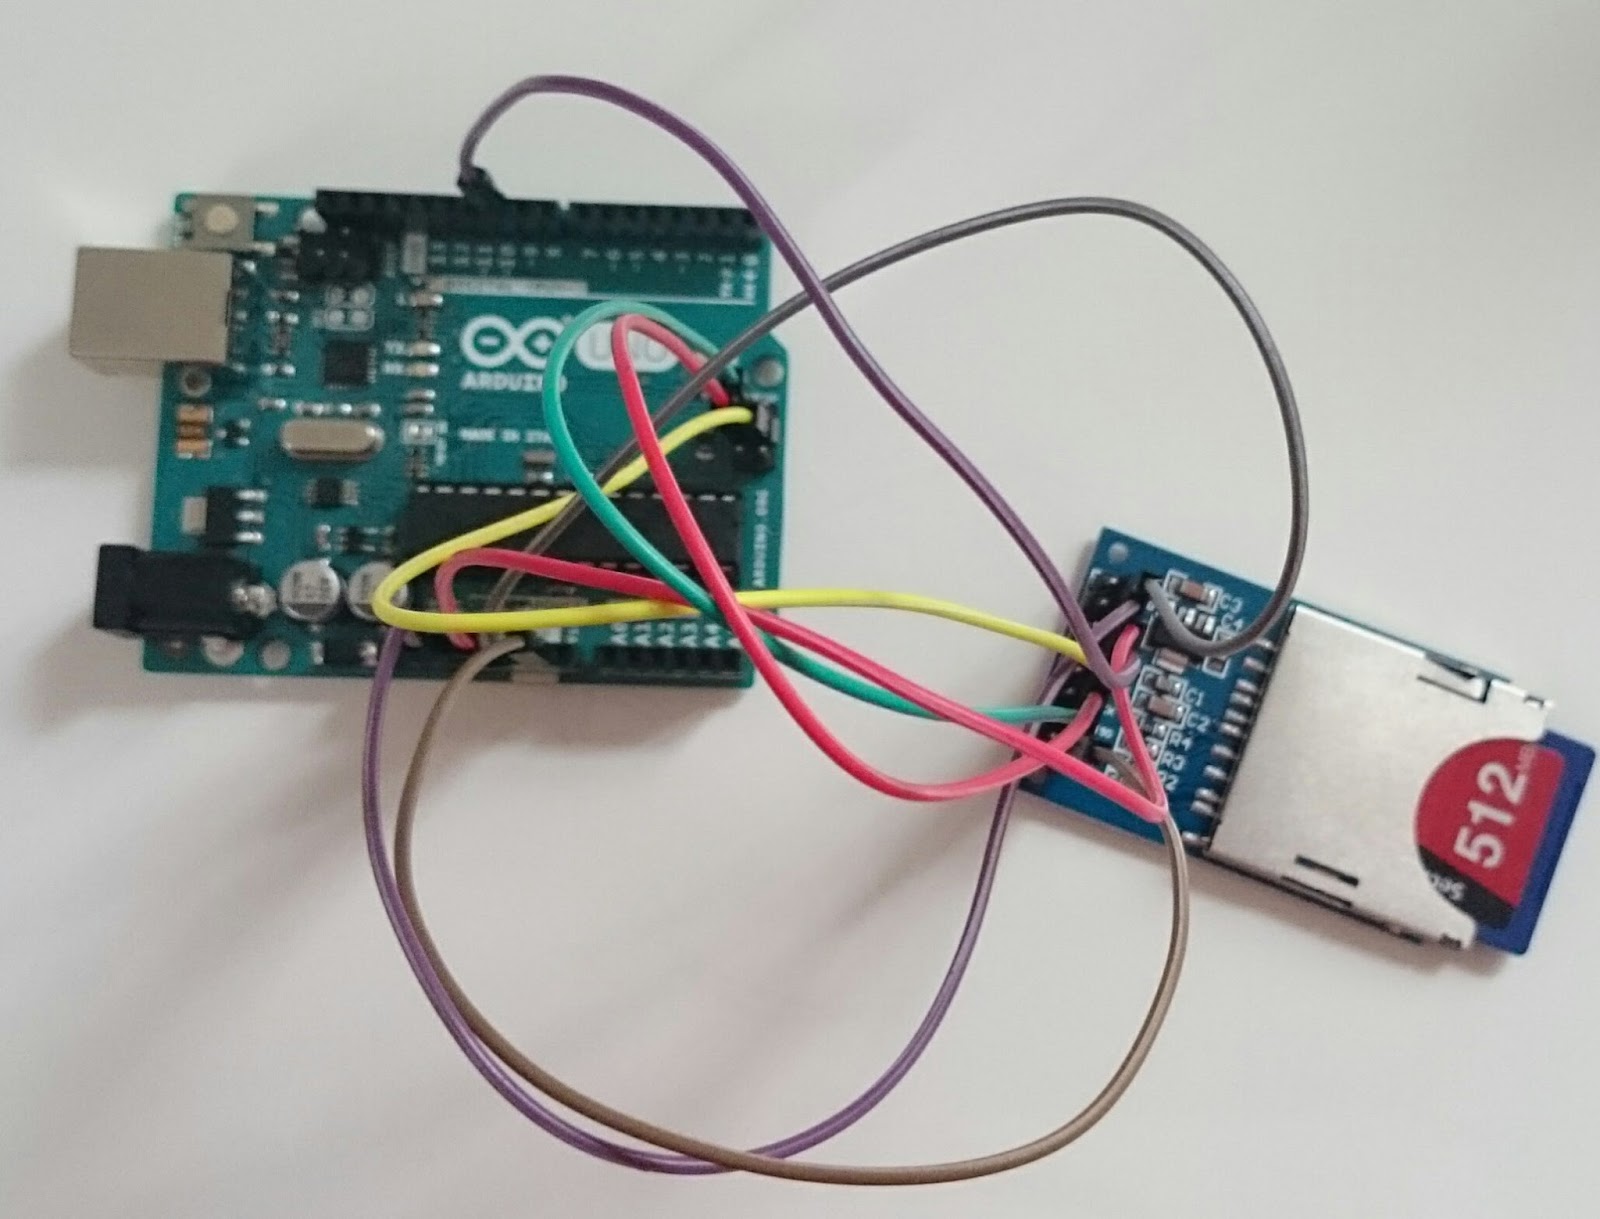
Die Verkabelung
Welchen SD Card Reader für den Arduino (hier auf amazon.de) man wählt, ist eigentlich egal, da sie alle mittels dem SPI Protokoll mit dem Arduino kommunizieren. Dementsprechend kann man sie alle mit der Standard SD Library des Arduino verwenden. Hier findet ihr meinen SD Card Reader für den Arduino auf Amazon.
Da der Reader und der Arduino über SPI kommunizieren, muss man nur 6 Pins verbinden. Dabei gibt es vier Datenpins: MISO, MOSI, SCK und SS, manchmal auch als CS bezeichnet. Dabei könnt ihr für MISO, MOSI und SCK entweder den SPI Header verwenden, oder Pin 11 bis 13, wobei sie mit dem selben Pin am Mikrocontroller verbunden sind. Das heißt, wenn du den SPI Header statt den digital Pins verwendest, kannst du die digital Pins trotzdem nicht anderweitig verwenden. SS beziehungsweise CS ist am Arduino Uno immer digital Pin 10.
Das Pinout des SPI Headers des Uno ist:
1: MISO, oder digital 12
2: Ground
3: SCK, oder digital 13
4: MOSI, oder digital 11
5: Reset
6: +5V
Solltet ihr einen anderen Arduino als den Arduino Uno verwenden, können die Pins abweichen, das Prinzip ist jedoch das Selbe. Hier findet ihr das Pinout der Arduinos im Überblick.
Bei meinem SD Reader gibt es komischerweise 2 Ground Pins und 5V und 3.3V. Diese müssen alle vier angeschlossen werden, damit der Reader aktiviert ist.
Die Software
Praktischerweise gibt es, wie bereits erwähnt, eine einheitliche SD Library für den Arduino, welche mit allen Modellen von SD Card Reader zusammen arbeiten kann. Dabei ist die Bibliothek schon mit der Arduino IDE installiert, muss also nur noch im Sketch nachgeladen werden.
Zusätzlich ist ein Beispielsketch (Datei > Beispiele > SD > CardInfo) mitgeliefert, mithilfe dessen man die Schaltung, den SD Card Reader und die SD Karte selbst testen kann. Dabei müsst ihr nur angeben, was der SS beziehungsweise CS Pin eures Arduinos ist, beim Uno beispielsweise 10.
Hier ist der Sketch nochmal abgebildet:
This file contains hidden or bidirectional Unicode text that may be interpreted or compiled differently than what appears below. To review, open the file in an editor that reveals hidden Unicode characters.
Learn more about bidirectional Unicode characters
/* | |
SD card test | |
This example shows how use the utility libraries on which the' | |
SD library is based in order to get info about your SD card. | |
Very useful for testing a card when you're not sure whether its working or not. | |
The circuit: | |
* SD card attached to SPI bus as follows: | |
** MOSI - pin 11 on Arduino Uno/Duemilanove/Diecimila | |
** MISO - pin 12 on Arduino Uno/Duemilanove/Diecimila | |
** CLK - pin 13 on Arduino Uno/Duemilanove/Diecimila | |
** CS - depends on your SD card shield or module. | |
Pin 4 used here for consistency with other Arduino examples | |
created 28 Mar 2011 | |
by Limor Fried | |
modified 9 Apr 2012 | |
by Tom Igoe | |
*/ | |
// include the SD library: | |
#include <SPI.h> | |
#include <SD.h> | |
// set up variables using the SD utility library functions: | |
Sd2Card card; | |
SdVolume volume; | |
SdFile root; | |
// change this to match your SD shield or module; | |
// Arduino Ethernet shield: pin 4 | |
// Adafruit SD shields and modules: pin 10 | |
// Sparkfun SD shield: pin 8 | |
const int chipSelect = 10; | |
void setup() | |
{ | |
// Open serial communications and wait for port to open: | |
Serial.begin(9600); | |
while (!Serial) { | |
; // wait for serial port to connect. Needed for Leonardo only | |
} | |
Serial.print("\nInitializing SD card..."); | |
// On the Ethernet Shield, CS is pin 4. It's set as an output by default. | |
// Note that even if it's not used as the CS pin, the hardware SS pin | |
// (10 on most Arduino boards, 53 on the Mega) must be left as an output | |
// or the SD library functions will not work. | |
pinMode(10, OUTPUT); // change this to 53 on a mega | |
// we'll use the initialization code from the utility libraries | |
// since we're just testing if the card is working! | |
if (!card.init(SPI_HALF_SPEED, chipSelect)) { | |
Serial.println("initialization failed. Things to check:"); | |
Serial.println("* is a card is inserted?"); | |
Serial.println("* Is your wiring correct?"); | |
Serial.println("* did you change the chipSelect pin to match your shield or module?"); | |
return; | |
} else { | |
Serial.println("Wiring is correct and a card is present."); | |
} | |
// print the type of card | |
Serial.print("\nCard type: "); | |
switch (card.type()) { | |
case SD_CARD_TYPE_SD1: | |
Serial.println("SD1"); | |
break; | |
case SD_CARD_TYPE_SD2: | |
Serial.println("SD2"); | |
break; | |
case SD_CARD_TYPE_SDHC: | |
Serial.println("SDHC"); | |
break; | |
default: | |
Serial.println("Unknown"); | |
} | |
// Now we will try to open the 'volume'/'partition' - it should be FAT16 or FAT32 | |
if (!volume.init(card)) { | |
Serial.println("Could not find FAT16/FAT32 partition.\nMake sure you've formatted the card"); | |
return; | |
} | |
// print the type and size of the first FAT-type volume | |
uint32_t volumesize; | |
Serial.print("\nVolume type is FAT"); | |
Serial.println(volume.fatType(), DEC); | |
Serial.println(); | |
volumesize = volume.blocksPerCluster(); // clusters are collections of blocks | |
volumesize *= volume.clusterCount(); // we'll have a lot of clusters | |
volumesize *= 512; // SD card blocks are always 512 bytes | |
Serial.print("Volume size (bytes): "); | |
Serial.println(volumesize); | |
Serial.print("Volume size (Kbytes): "); | |
volumesize /= 1024; | |
Serial.println(volumesize); | |
Serial.print("Volume size (Mbytes): "); | |
volumesize /= 1024; | |
Serial.println(volumesize); | |
Serial.println("\nFiles found on the card (name, date and size in bytes): "); | |
root.openRoot(volume); | |
// list all files in the card with date and size | |
root.ls(LS_R | LS_DATE | LS_SIZE); | |
} | |
void loop(void) { | |
} |
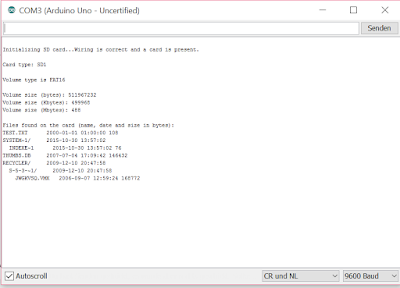
Wenn ihr nun nach dem Upload des Sketches die serielle Konsole mit Datenrate 9600 öffnet, werdet ihr die, auf der SD Karte gespeicherten, Dateien sehen:
Fazit
SD Karten sind eine gute Möglichkeit die Speicherkapazität des Arduinos zu erweitern, insbesondere da sie billiger und größer sind als externer EEPROM, und zusätzlich dank der SPI Kommunikation einfach zu verbinden. Sehr empfehlen kann ich euch für den Einstieg diesen SD Card Reader auf Amazon.
Im nächsten Post geht es darum, wie man mit Dateien auf der SD Karte mit dem Arduino arbeitet.
Please translate this page in English
AntwortenLöschenThere is a translate button in the upper right corner(desktop version).
Löschen